Can you SSH from an iPhone?
Yes. iOS still ships no built-in terminal, but installing an SSH client from the App Store gives you a complete SSH client in your pocket — enough to connect to a Linux server, a VPS, your Mac, or a Raspberry Pi and run real commands. No jailbreak, no computer, no developer account. It takes about five minutes the first time.
The short version, if you just want the steps:
- Install an SSH client from the App Store (TermAI, Blink Shell, Termius, Easy SSH, Prompt 3 — any of them).
- Add a connection: host (IP or hostname), port
22, and your username. - Pick authentication: password to test, an SSH key for anything you'll use again.
- Tap connect and accept the host-key fingerprint the first time.
- Use the special-key row (Esc / Tab / Ctrl / arrows) — without it half the shell is unreachable on a phone keyboard.
The rest of this guide walks through each step with screenshots, then covers the parts that actually trip people up: Raspberry Pi defaults, reaching a machine that isn't on your Wi-Fi, iOS killing your session in the background, and the four errors you're most likely to hit. The screenshots are from TermAI, but the flow is nearly identical in any modern client.
Naming note: "SSH from iPhone", "SSH on iPhone", "iPhone SSH" and "how to SSH from iPhone" are all the same question, and this page covers all of them — plus the one that isn't: SSHing into an iPhone, answered here. Verified against current iOS in August 2026.
What you need before you start
- An iPhone with an SSH client installed. Any iPhone that runs a current iOS will do; these are ordinary App Store apps.
- The server's host — an IP address (
192.168.1.50) or a hostname (myserver.example.com,raspberrypi.local). - A username on that server —
root,ubuntu,ec2-user,admin, or whatever you created. - Either the account password or an SSH key whose public half is on the server.
- A network path to the machine. Same Wi-Fi is easiest. A public IP works. For a box behind a home router while you're out, you'll want a mesh VPN — covered below.
- SSH actually running on the target. On most Linux servers it already is; on a Mac, Windows PC, or a fresh Pi you have to switch it on first.
You do not need a jailbreak, a Mac, a paid Apple Developer account, or a subscription — several clients connect for free indefinitely.
Step 1 — Install an SSH client for iPhone
Because iOS has no Terminal app of its own, the client is the terminal. Any of these will complete this guide; we compared them in depth here.
| App | Price (checked Aug 2026) | Connect for free? | Worth it for |
|---|---|---|---|
| TermAI | Free; Pro $2.99/mo | Yes, unlimited connections | AI command help in-session, built-in Tailscale, same app on Android |
| Blink Shell | ~$19.99/yr after a 14-day trial | Trial only | Speed, mosh, hardware keyboards |
| Termius | Free Starter; Pro ~$10/mo billed yearly | Yes, but host- and device-limited | Syncing the same hosts to a desktop |
| Easy SSH | Free (all features) | Yes | No account, no paywall, native |
| Prompt 3 | ~$19.99/yr or a one-time lifetime option, 7-day trial | Trial only | Panic polish, Secure Enclave and YubiKey auth |
Prices vary by region and change; confirm on the App Store listing before subscribing.
This guide uses TermAI because it has a free tier that connects without an account, an AI assistant for when a command fails, and Tailscale built in for the remote-access step later. Whatever you pick, steps 2–5 look almost the same.
Step 2 — Add a connection
Tap to create a new connection and fill in three things:
- Host — the server's IP address or hostname (e.g.
192.168.1.50ormyserver.example.com) - Port —
22unless your server uses a custom one - Username — your login on that server (e.g.
root,ubuntu,pi)
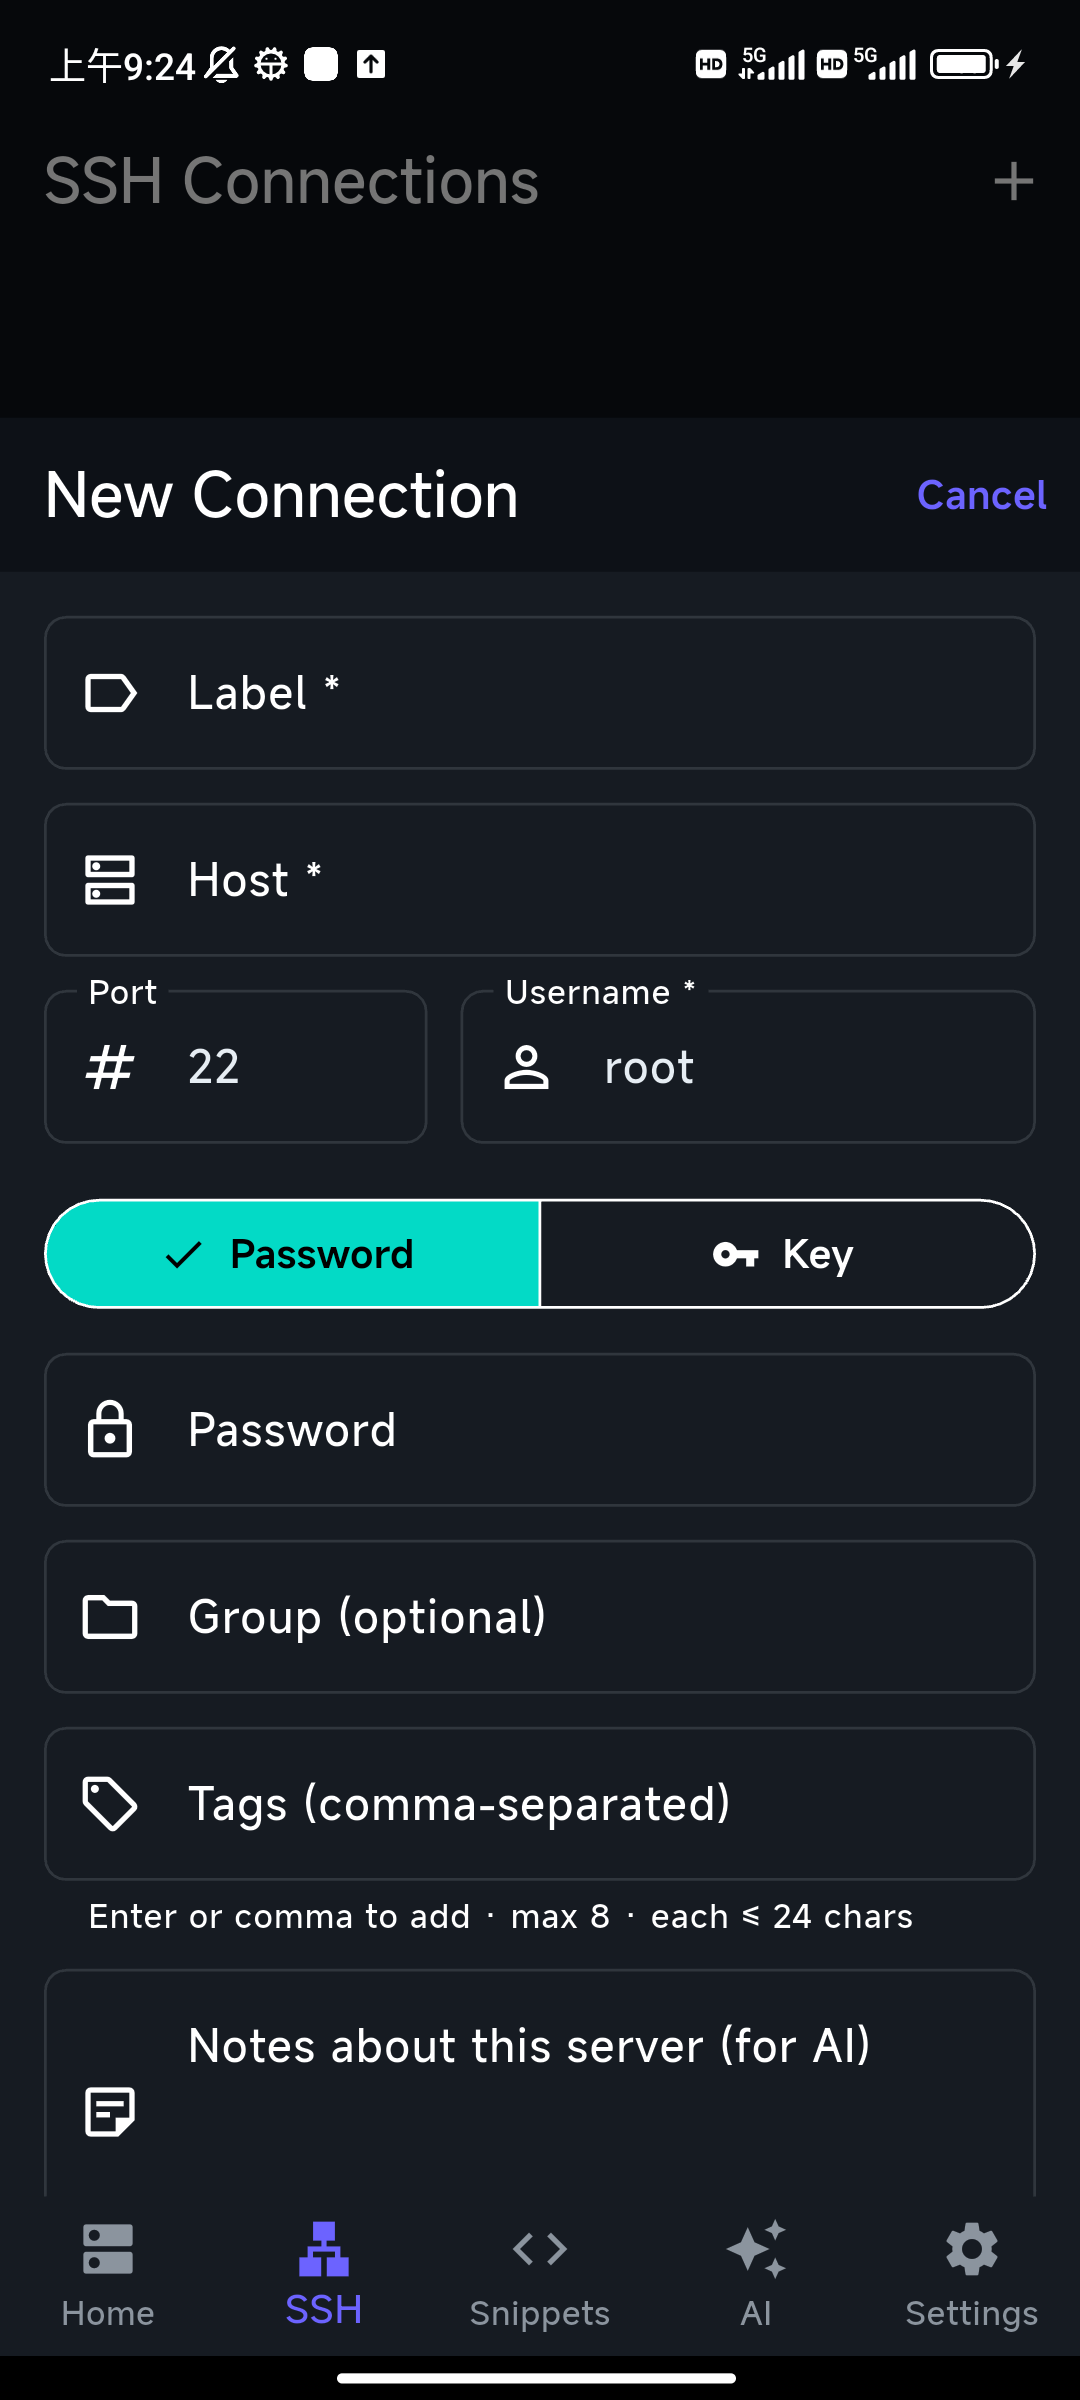
Two things people get wrong here. The username is the server's user, not your Apple Account — nothing about your iPhone identity is involved. And if you're on a home network, find the right IP first: check your router's client list, or run ip a (Linux) / ipconfig (Windows) / ifconfig (macOS) on the target machine. A hostname ending in .local only resolves on the same LAN.
Step 3 — Choose how you authenticate
Two options:
- Password — simplest to start: type your server password when prompted.
- SSH key — more secure and the right long-term choice. Generate or import a key in the app, then add its public key to the server's
~/.ssh/authorized_keys. After that you connect with no password.
For a server you'll use often — especially anything exposed to the internet — use a key and consider disabling password login on the server.
Generating a key on the phone vs. importing one you already have
Both work, and the choice matters more than people think:
- Generate on the iPhone (recommended). The private key is created on-device and stored in the iOS Keychain behind Face ID; it never travels. You then copy the public half to the server. One key per device means you can revoke the phone alone if you lose it, without touching your laptop's access. Step by step: create an SSH key on iPhone.
- Import an existing key. Paste the private key or open it from the Files app. Passphrase-protected keys and AWS
.pemfiles both work. Getting a key file onto the phone safely is the awkward part — AirDrop from your Mac or an encrypted note beats emailing it to yourself.
Two gotchas: PuTTY .ppk keys are not OpenSSH format and must be converted on a desktop first, and if you're choosing a new key type, Ed25519 beats RSA on both speed and size — which is noticeable on a phone. If you want the reasoning for keys over passwords at all, see SSH keys vs passwords.
Step 4 — Connect
Tap the connection. On the very first connect you'll see a host-key fingerprint prompt — that's normal and a good thing (it's how SSH pins the server's identity so nobody can impersonate it later). Accept it once and you're in.
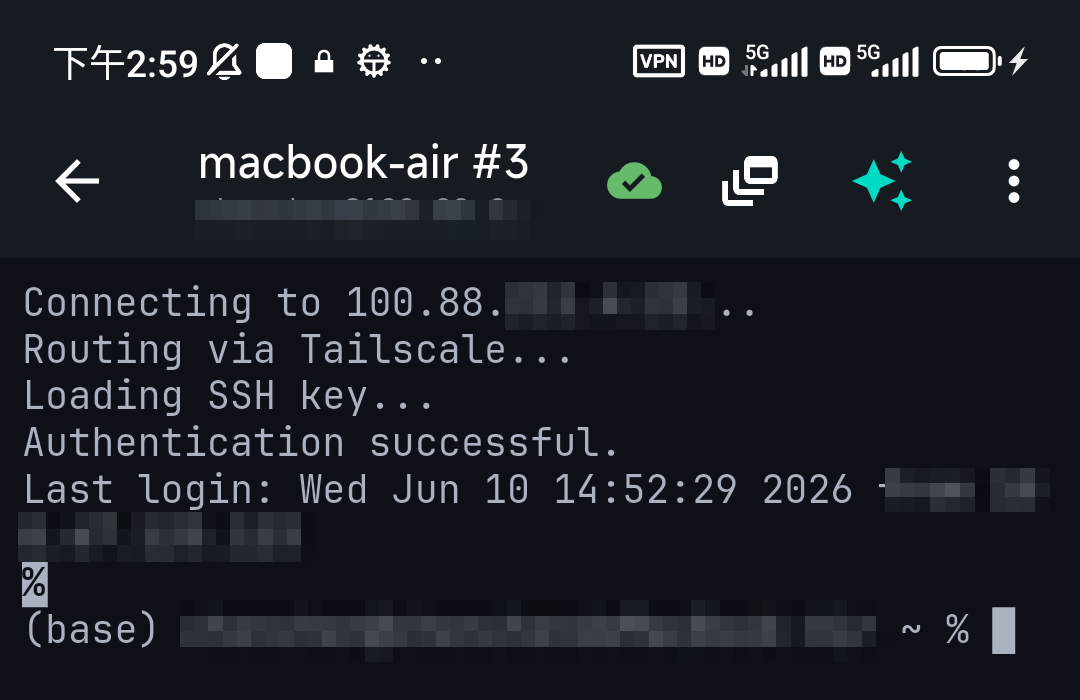
What you're looking at is a real shell, not a restricted one: htop, vim, tmux, docker ps, journalctl -f all behave the way they do on a laptop, because SSH doesn't care what kind of machine you typed from. If that fingerprint prompt ever comes back unexpectedly on a server you've connected to before, stop — that's the warning the mechanism exists for. Background: host key verification explained.
Step 5 — Make the keyboard usable
This is the step guides skip, and it's the one that decides whether SSH on an iPhone is pleasant or miserable. The iOS keyboard has no Esc, no Tab, no Ctrl, and no arrow keys — which means no Ctrl+C, no tab-completion, no command history, and no way out of vim.
Every serious iPhone SSH client solves this with a special-key row above the keyboard. Learn these five and the phone becomes a real terminal:
- Ctrl+C — kill the running command. The single most-used key on a phone.
- Tab — completion, so you're not typing long paths on a touchscreen.
- ↑ — recall the last command instead of retyping it.
- Esc — get out of
vim's insert mode, cancel prompts. - Ctrl+D or typing
exit— end the session cleanly (more ways to exit).
Two more phone-specific habits worth building: save the commands you run constantly as snippets so they're one tap, and paste rather than type anything long. A full list of what's worth memorising is in SSH keyboard shortcuts on a phone. If you pair an external keyboard — on an iPhone or, more usefully, an iPad — check the client maps Esc and Ctrl properly; see SSH from an iPad.
SSH into a Raspberry Pi from your iPhone
Same four steps, with Pi-specific details that have changed since most tutorials were written:
- Enable SSH first. Easiest: turn it on in Raspberry Pi Imager's advanced options before you write the card. On a running Pi:
sudo raspi-config→ Interface Options → SSH. On a card you've already written, place an empty file namedsshon the boot partition (on Bookworm and later that partition mounts at/boot/firmware). - There is no default
piuser any more. Raspberry Pi removed the built-inpi/raspberryaccount in 2022 for security reasons — you now create the username yourself in Imager or in the first-boot wizard. Use that name in step 2. Older guides telling you to log in aspiwith passwordraspberryare out of date, and the empty-ssh-file trick alone won't help if no user account exists yet (that's what Imager's settings, or auserconf.txt, are for). - Finding it. Try the hostname you set in Imager plus
.local(e.g.raspberrypi.local) on the same Wi-Fi, or look up the Pi's IP in your router's DHCP client list.
That's headless Pi administration from your phone: no monitor, no keyboard, no HDMI adapter. Full walkthrough with screenshots: SSH from iPhone to a Raspberry Pi. Common Pi jobs from the phone — Pi-hole and Home Assistant — have their own guides.
SSH from iPhone to a Mac, PC, Linux, or Windows
The steps are identical; only the host details change:
- To a Mac — enable Remote Login (System Settings → General → Sharing), then connect with the Mac's IP or
.localname and your macOS short username. Note that macOS's own username is often not what you'd guess — check it withwhoami. Full guide: SSH from iPhone to Mac. - To a Windows PC — install the built-in OpenSSH Server (Settings → System → Optional features → Add → OpenSSH Server), start the
sshdservice, then connect with your Windows account name. You'll land in a PowerShell or CMD prompt rather than bash; to get a Linux shell instead, SSH into WSL. - To a Linux server or PC — use the machine's IP and a user like
ubuntuorroot. This is the most common case and works out of the box on most distros, sinceopenssh-serveris installed by default on server images. On a desktop distro you may needsudo apt install openssh-serverfirst. - To a VPS or cloud instance — the same, using the provider's default user:
rooton most VPS images,ubuntuon Ubuntu AMIs,ec2-useron Amazon Linux. Import the provider's.pemkey in step 3. See SSH to EC2 from your phone and managing a VPS from a phone. - To another phone or a container — Android with Termux running
sshdworks fine; Docker containers usually don't run SSH at all and are better reached withdocker execafter you SSH to the host (details).
Connecting to a server outside your home network
SSH works instantly on your local Wi-Fi. The moment you leave the house — on cellular, or on café Wi-Fi — a private address like 192.168.1.50 stops meaning anything, and this is where most "it worked yesterday" reports come from. You have three options, in order of how much we'd recommend them:
- A mesh VPN (recommended). Tailscale or WireGuard give the server a stable private address that works from anywhere, with nothing exposed to the internet. TermAI has Tailscale built in, so tailnet machines show up in the host list without a second app juggling VPN profiles — see Tailscale on iPhone and Tailscale vs WireGuard.
- Port forwarding. Works, but it publishes SSH to the whole internet and it will start logging bot attempts within hours. If you do it: key-only auth, no root login, and fail2ban. Also note that many home ISPs and essentially all mobile carriers put you behind CGNAT, in which case there is no inbound path to forward at all — no router setting can fix that.
- A reverse tunnel from the server out to a machine that does have a public IP. Fiddly, but it works from behind any NAT (SSH tunnelling explained).
One more case that catches people out: some hotel, café, and corporate networks allow only ports 80 and 443, so port 22 simply never gets through. If you administer the server, having sshd also listen on 443 is the standard workaround (changing the SSH port); if you don't, tethering to cellular usually gets you out. Broader options: accessing a home server from anywhere.
Keeping an iPhone SSH session alive
This is the most common complaint about SSH on a phone and it isn't your app's fault: iOS suspends apps within seconds of leaving the foreground, which drops the TCP connection. Switch to Safari to read a doc, come back, and the session is dead. Nothing an App Store client does can fully escape that sandbox. What actually helps:
- Run long jobs inside
tmuxorscreenon the server. This is the real fix. The process belongs to the server, not to your phone, so a dropped connection costs you nothing — reattach withtmux attachand it's still running. See keeping a process running after SSH disconnects. - Use mosh where the client supports it (Blink Shell, Prompt 3). Mosh is built for exactly this: it survives IP changes and sleep by design (mosh vs SSH).
- Or rely on auto-reconnect — TermAI retries automatically after a drop, which papers over the short backgrounding that happens constantly on a phone.
- Expect a drop when you switch networks. Moving from Wi-Fi to 5G changes your IP, which ends a plain SSH session; a stable tailnet address plus tmux makes this a non-event.
If sessions die mid-command with a specific error rather than silently, see broken pipe and connection closed by remote host.
Can you SSH into an iPhone?
No — not on a stock iPhone. This is the other half of what people mean by "iPhone SSH", so it's worth answering plainly. iOS runs no SSH server, and the App Store doesn't permit an app to provide one, so there is nothing on the phone for a computer to connect to. That capability only ever existed on jailbroken devices (the old root/alpine default that security guides warn about).
Everything on this page is the opposite direction: your iPhone is the client, connecting out to a server. If your actual goal is reaching files on the phone from a computer, use the Files app, AirDrop, iCloud Drive, or an SFTP/WebDAV client app instead — and if the goal is moving files between phone and server, that's SFTP, which most of these clients include (best SFTP app for iOS, transferring files over SSH).
The ssh command on iPhone, iSH, a-Shell, and "PuTTY for iPhone"
Three related things that come up in the same searches:
- There is no
sshcommand to type on iOS, because there's no shell to type it into. Apple ships Terminal on macOS — including a redesigned one in macOS 26 — but has never shipped one on iOS, and iOS 26 didn't add it. (iOS 27, announced at WWDC on June 8, 2026 and expected in September 2026, isn't advertising one either.) A client app replaces the command with a form: host, port, username. - iSH and a-Shell give you a shell that runs on the phone itself — iSH emulates x86 to run Alpine Linux, a-Shell provides native Unix tools plus Python. Both are free, and you can run
sshinside them, but there's no saved-host list, no key manager, no tap-to-connect, and iSH's emulation is slow. They're for running tools locally, not for administering servers. - "PuTTY for iPhone" doesn't exist. PuTTY is a Windows program with no iOS version; anything on the App Store using the name is unrelated. Use a real iOS client — and convert any
.ppkkeys to OpenSSH format on a desktop before importing (more on PuTTY on mobile).
Troubleshooting: the errors you'll actually hit
| What you see | What it means | Fix |
|---|---|---|
| Connection refused | You reached the machine, but nothing is listening on that port | Start/enable SSH on the target (sudo systemctl status ssh), or correct the port. Full guide |
| Connection timed out | You never reached the machine at all | Wrong IP, wrong network, or a firewall. From outside your LAN, use Tailscale. Full guide |
| Permission denied (publickey,password) | You reached SSH but it rejected you | Check the username first — it's the usual culprit — then the password, or that your public key is in ~/.ssh/authorized_keys. Full guide |
| Still asking for a password after adding a key | The server isn't accepting the key | Almost always permissions: ~/.ssh must be 700 and authorized_keys 600. Full guide |
| Host key verification failed | The server's identity doesn't match what was pinned | Expected if you rebuilt the server — then clear the stored key. If you didn't, stop and investigate. Full guide |
| No matching host key type | A very old server and a modern client disagree on algorithms | Update the server's sshd, or enable the legacy algorithm deliberately. Full guide |
| Works at home, not away | You're asking for a private IP from outside the LAN | Use a mesh VPN — see remote access |
| Session dies when you switch apps | iOS suspended the app | Normal. Use tmux/mosh/auto-reconnect — see keeping sessions alive |
For errors inside a session — a command that fails once you're connected — TermAI lets you long-press to select the output and tap 🤖 Ask AI, which sends that exact error to the assistant along with the session's real context (OS, what's installed, recent output) for an explanation. It beats retyping a cryptic message into a search box on a phone. A wider index of failures is in the SSH troubleshooting guide.
Is SSH from an iPhone safe?
The protocol is identical to the one you use from a laptop, so the encryption isn't the weak point — the device is. A phone is arguably the safer end of the connection: the key sits in the Secure Enclave-backed Keychain behind Face ID rather than as a plain file in ~/.ssh on a shared desktop. Five things worth doing:
- Use a key, not a password, and give the phone its own key so you can revoke it alone if the device is lost.
- Turn on the client's Face ID / passcode lock, separate from the phone's own unlock.
- Verify the host fingerprint on first connect, and take a repeat prompt seriously.
- On the server, disable root login and password auth once your key works.
- Don't port-forward 22 if you can use a mesh VPN instead.
One iOS-specific note: an SSH client can't read your key material from other apps, and a key generated on-device can't be exported from the Secure Enclave at all — see Secure Enclave SSH keys for the trade-offs of that.
FAQ
How do I SSH from my iPhone?
Install an SSH client from the App Store, create a connection with the server's host (IP or hostname), port 22, and your username, choose a password or an SSH key, then tap connect and accept the host-key fingerprint the first time. The whole thing takes about five minutes and needs no jailbreak.
Is there a built-in terminal on iPhone?
No. Apple ships Terminal on macOS but has never shipped one on iOS — iOS 26 didn't add it, and iOS 27 (announced June 8, 2026) isn't advertising one. An SSH client app provides the terminal.
Does iPhone support SSH?
Yes, as a client. iOS has no SSH built in, but App Store clients implement the full protocol — keys, SFTP, port forwarding, jump hosts — so an iPhone connects to a server exactly like a laptop does.
Do I need to jailbreak to SSH from iPhone?
No. A normal App Store SSH client works on any stock iPhone. Jailbreaking is only relevant to the reverse direction — running an SSH server on the phone.
Can I SSH into my iPhone from a computer?
No. Stock iOS runs no SSH server and the App Store doesn't allow one, so there's nothing to connect to. Use the Files app, AirDrop, or an SFTP app to reach files on the phone instead.
What's the best app to SSH from an iPhone?
TermAI if you want an AI assistant and built-in Tailscale on a free tier (and the same app on Android); Blink Shell for the fastest keyboard-first terminal with mosh; Termius if you want the same hosts on a desktop; Easy SSH if you want everything free with no account; Prompt 3 for native polish and hardware-key auth. Full comparison: best SSH client for iPhone.
Can I SSH from an iPhone for free?
Yes. Easy SSH is free outright, TermAI's free tier allows unlimited SSH and SFTP connections, and Termius Starter connects with a small host limit. You never need to pay to make a first connection.
How do I SSH from my iPhone to a Linux server?
That's the standard case and needs nothing special on the server: most Linux distributions run openssh-server already. Use the server's IP, port 22, and a user such as ubuntu or root. On a desktop distro that refuses the connection, install it with sudo apt install openssh-server.
How do I SSH from my iPhone to a Raspberry Pi?
Enable SSH in Raspberry Pi Imager or with sudo raspi-config, then connect to the Pi's IP or .local hostname with the username you created during setup. There's been no default pi/raspberry account since 2022.
Can I SSH from my iPhone over cellular data?
Yes — SSH is just TCP and works fine on 4G/5G. What breaks is addressing: a private IP like 192.168.x.x is unreachable off the LAN, and carriers put you behind CGNAT. Use Tailscale or another mesh VPN and the server keeps the same address everywhere.
Why does my iPhone SSH session disconnect when I leave the app?
iOS suspends backgrounded apps within seconds, which drops the connection. Run long jobs in tmux on the server, use mosh, or pick a client that auto-reconnects.
Can I use my existing SSH key on an iPhone?
Yes — paste it or import it from the Files app, including passphrase-protected keys and AWS .pem files. Generating a fresh key on the phone and adding its public half to authorized_keys is the better habit, since you can revoke that one device. PuTTY .ppk files must be converted to OpenSSH format first.
Is SSH from a phone secure?
Yes — it's the same encrypted SSH protocol as on a desktop. Use key authentication, keep the key in the Keychain behind Face ID, accept and check the host-key prompt on first connect, and lock the app itself.
Is SSH on an iPad the same as on an iPhone?
Identical apps and identical steps — iPadOS has no terminal either. The difference is ergonomic: an external keyboard makes the special-key row less critical. See SSH from an iPad.
How do I exit an SSH session on iPhone?
Type exit and press Enter, or use the Ctrl key in the special-key row followed by D. Closing the app also ends the session — which is why long jobs belong in tmux.
Quick Facts
- Task: SSH from an iPhone to a Linux server, VPS, Mac, Windows PC, or Raspberry Pi
- Needed: an App Store SSH client — no jailbreak, no computer, no developer account
- Built-in terminal on iOS: none, as of iOS 26 / iOS 27 (August 2026)
- Connection: host (IP/hostname) + port 22 + username
- Auth: password to start; SSH key for anything serious
- Keyboard: use the client's Esc/Tab/Ctrl/arrow row — Ctrl+C and Tab are the ones you'll miss
- Raspberry Pi: enable SSH first; no default
piuser since 2022 - Remote access: use Tailscale instead of forwarding port 22
- Long jobs: run them in
tmux— iOS suspends backgrounded apps - SSH into an iPhone: not possible on stock iOS — no SSH server exists
- Time: about 5 minutes for a first connection
Free on iOS and Android. 5 AI requests/day on the free tier, plus unlimited SSH/SFTP and built-in Tailscale.